本系列基于 Spring Framework 文档深入探究 Spring 的使用姿势及原理。
一些简单概念略过不讲,希望阅读这篇文章的你对 Spring 有一定了解。
本文讲第一部分——IoC 容器、bean 概述、依赖注入和 bean 的作用域。
简介
Spring Framework 的 IoC 容器主要在 org.springframework.beans 和 org.springframework.context 这两个包里,BeanFactory 接口提供了更高级的注册机制能够管理任意类型的对象。 ApplicationContext 接口继承了 BeanFactory 接口,并添加了更易与 Spring AOP 集成的特性、消息资源管理(用于国际化)、事件发布、应用层特定上下文(例如用于 web 应用的 WebApplicationContext)。简而言之,BeanFactory 提供了注册框架和基础功能,ApplicationContext 增加了更多企业级应用的特定功能。本章重点讲 ApplicationContext,关于 BeanFactory 详见下文。
容器概论
ApplicationContext 接口表示 Spring 的 IoC 容器,它负责实例化(instantiate)、配置和组装 beans。ApplicationContext 通过从 XML、注解或是代码得知哪些类需要被加载、以何种方式加载、依赖关系是什么。
Spring 提供了一些 ApplicationContext 的实现,常见的例如 ClassPathXmlApplicationContext 和 FileSystemXmlApplicationContext,都是通过 XML 配置来实现的。大多数场景下,用户代码并不需要自己实例化出一个 Spring IoC 容器,可以通过一个简单的 web.xml 便可实现。
1 | <context-param> |
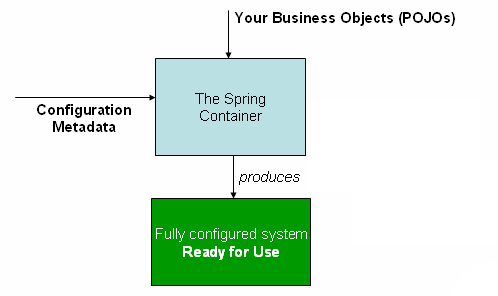
下图简要展示了 Spring IoC 容器的工作原理,你的 POJOs 结合配置项元数据,这样,ApplicationContext 创建并初始化后,你就拥有了一个配置完全且可运行的系统/应用。
配置项元数据(Configuration Metadata)
上文说了,Spring IoC 容器使用配置项元数据的形式配置,支持传统的 XML 格式,从 Spring 2.5 开始支持基于注解的配置项元数据,从 3.0 开始,Spring JavaConfig 提供的很多特性使你可以通过一些类来定义 beans,包括 @Configuration、 @Bean、@Import 以及 @DependsOn 等注解。
Spring 配置项包含一个或多个容器管理的 bean 定义(definition)。在 XML 中使用<beans/>中的<bean/>标签,代码方式则在@Configuration注解的类中使用@Bean注解的方法。通常我们用其定义服务层对象、DAOs、展示对象、基础设置对象(例如一些框架工厂类)等等。通常在容器中不注册细粒度的域对象,因为这通常是 DAOs 的责任,应当又业务逻辑创建和加载这些对象。不过,你可以使用 Spring 的 AspectJ 集成来注册在 IoC 容器控制之外创建的对象。详见下文。
以下是一个典型的 XML 配置项元数据。
1 |
|
See Dependencies for more information.
实例化容器
我们可以从各种外部资源(本地文件系统、Java CLASSPATH等)指定 ApplicationContext 构造时使用的资源文件。官方文档此处给了一个简单的例子:
1 | ApplicationContext context = new ClassPathXmlApplicationContext("services.xml", "daos.xml"); |
services.xml:
1 |
|
daos.xml:
1 |
|
从其他 XML 文件导入 beans
1 | <beans> |
namespace 也提供了 import、context 和 util 等功能,此处不再详细解释说明。
注:虽然可以使用../这样的相对路径,但是不推荐,这可能会导致引用了应用之外的文件,例如classpath:../services.xml
使用容器
ApplicationContext 是一个高级工厂,其维护了不同 beans 的注册项和他们的依赖。通过使用方法T getBean(String name, Class<T> requiredType)你可以获取到这些 bean 的实例。
举例:
1 | // create and configure beans |
有一种最灵活的方式是GenericApplicationContext结合 reader 委托,以 XmlBeanDefinitionReader 为例:
1 | GenericApplicationContext context = new GenericApplicationContext(); |
你可以混合使用不同的 reader 委托到同一个ApplicationContext上,以便从不同的源注册 bean。
尽管提供了 getBean 方法来获取 bean,ApplicationContext 也提供了一些其他方法来获取,但是事实上应用程序代码不应当通过这些 Spring API 来获取 bean。
Bean 概论
一个 IoC 容器管理一个或多个 bean,这些 bean 根据你提供给容器的配置项元数据来构建。
在容器内部,这些 bean 定义以BeanDefinition对象的形式存在,它通常包含以下元数据:
- 指定包的类名:通常是 bean 的实现类
- Bean 的配置方式:定义 bean 在容器中的行为,包括作用域(scope)、生命周期回调(lifecycle callbacks)等
- 对其他 bean 的引用:这些引用也被称为 bean 的合作/依赖项
- 在新创建对象中的其他配置设置:比如对于管理连接池的 bean 而言可以包括连接池的大小、最大连接数等
| 属性 | 解释 |
|---|---|
| Class | [实例化](<#bean\ 的实例化>) |
| Name | [命名](<#bean\ 的命名>) |
| Scope | 作用域 |
| Constructor arguments | 依赖注入 |
| Properties | 依赖注入 |
| Autowiring mode | 自动注入合作项 |
| Lazy initialization mode | 懒加载 |
| Initialization method | 初始化回调 |
| Destruction method | 销毁回调 |
除了 bean 定义说明了怎样创建一个指定的 bean,ApplicationContext 也允许注册用户在容器外创建好的对象。通过 ApplicationContext 下 BeanFactory 的getBeanFactory()方法可以拿到 BeanFactory 的默认 DefaultListableBeanFactory 实现。DefaultListableBeanFactory 支持通过registerSingleton(...)和registerBeanDefinition(..)方法注册 bean。当然,通常我们只使用常规 bean 定义元数据。
注:我们应当尽早注册 bean 元数据和人工指定的单例,这样才能保证容器实例化时正确注入他们。尽管某种程度上支持重写已经存在的元数据和单例,但是运行时注册新的 bean(同时有并行访问工厂)官方并不支持,这可能导致并行获取异常以及容器的状态异常等。
bean 的命名
每个 bean 都有一个或多个标识符,标识符在容器内必须唯一。通常 bean 只有一个标识符,但有时有些 bean 也需要别名(aliase)。
bean 命名公约
公约使用标准 Java 公约的实例字段命名规则。bean 名称以小写字母开头,驼峰命名,例如
accountManager、accountService、userDao、loginController等。一致的命名风格可以使你的配置项更容易阅读和理解,并且如果你使用 AOP 的话,在为一系列以命名关联的 bean 配置 advice 时会很有帮助。
你可以使用 name 指定名称,alias 指定别名,此处过于简单不展开细讲。
bean 的实例化
bean 定义本质上是如何创建一个或多个对象的方法的定义,当容器需要拿一个 bean 时它会寻找这个定义并使用定义里保存的配置项元数据创建(或获取)一个实际的对象。通常情况下,bean 需要指定 class(除非工厂方法和 bean 定义继承)。我们通常有两种方式指定 class:
- 通常情况下,容器直接通过反射取到其构造函数,相当于 new 出一个对象放进容器;
- 少数情况下,容器调用静态工厂方法创建对象,这个静态工厂方法返回的对象可能和 class 相同,也可能完全不同。
内部类名
如果你想配置一个静态内部类的 bean,你需要使用内部类的二进制名称;
比如在 com.example 包中有一个 SomeThing 类,SomeThing 类下有一个 OtherThing 静态内部类,那么这个 bean 定义的 class 应当是
com.example.SomeThing$OtherThing。使用$符号分隔内外的类名。
使用构造器实例化
当我们通过构造方法创建 bean 时,所有普通类都可以使用并与 Spring 兼容。也就是说,开发的类不需要实现任何特定接口或以特定方式编码。 只需指定 bean 类就足够了。但是,根据为该特定 bean 使用的 IoC 类型,我们可能需要一个默认无参构造函数。
Spring IoC 容器几乎可以管理你希望它管理的任何类。 它不仅可以管理真正的 JavaBeans。大多数情况下我们更喜欢实际只有一个默认无参构造函数的 JavaBeans,提供一些适当的 setter 和 getter。当然你也可以在容器中指定其他外部的非 bean 风格的类。例如,如果你需要使用完全不符合 JavaBean 规范的旧连接池,Spring 也可以对其进行管理。
至于为构造函数提供参数的机制以及如何在构造对象后设置对象实例属性的,详见下文的依赖注入。
使用静态工厂方法实例化
定义使用静态工厂方法创建的 bean 时,需要使用 class 属性指定包含静态工厂方法的类并使用 factory-method 指定对应的工厂方法。此工厂方法(可以有参数)会创建一个对象,容器会把它当做构造函数创建的对象。这种 bean 定义的一个用途是在老式代码中调用静态工厂。
举例:
1 | <bean id="clientService" |
1 | public class ClientService { |
使用实例的工厂方法实例化
与通过静态工厂方法实例化类似,使用实例工厂方法进行实例化会从容器调用现有 bean 的非静态方法来创建新 bean。 要使用此机制,请将 class 属性保留为空,并在 factory-bean 属性中指定当前(或父级或祖先)容器中 bean 的名称,该容器包含要调用以创建对象的实例方法。 使用 factory-method 属性设置工厂方法本身的名称。 以下示例显示如何配置此类 bean:
1 | <!-- the factory bean, which contains a method called createInstance() --> |
1 | public class DefaultServiceLocator { |
当然,一个工厂类可以有多个工厂方法。
注:在 Spring 文档中,“工厂 bean”是指在 Spring 容器中配置并通过实例或静态工厂方法创建对象的 bean。 相比之下,FactoryBean(注意大小写)是指特定于 Spring 的 FactoryBean。
依赖
典型的企业应用程序不会只包含单个对象(或 Spring 说法中的 bean)。即使是最简单的应用程序也有一些对象可以协同工作,以呈现最终用户所看到的连贯应用程序。这节讲如何定义多个独立的 bean 定义,以及对象协作实现目标的完全实现的应用程序。
依赖注入(DI)
依赖注入主要有两种方式:基于构造函数和[基于 Setter](<#基于\ Setter\ 的依赖注入>)。
基于构造函数的依赖注入
基于构造函数的 DI 由容器调用具有多个参数的构造函数来完成,每个参数表示一个依赖项。这跟调用具有相同参数的静态工厂方法来构造 bean 是等效的,下面的解释同样适用于静态工厂方法。举个简单的 POJO 的例子:
1 | public class SimpleMovieLister { |
构造函数参数解析
容器会通过参数的类型与 bean 进行匹配,如果 bean 定义的构造函数参数中不存在歧义,那么在 bean 实例化时,这些参数按照定义中构造函数参数的顺序提供给对应的构造函数。
例如:
1 | package x.y; |
假如 ThingTwo 和 ThingThree 类没有继承上的关联,也就是不存在歧义,那么以下的配置就可以了,不需要在 <constructor-arg/> 元素中显式指定构造函数参数下标或类型。
1 | <beans> |
当使用简单类型时,例如 <value>true</value>,Spring 无法确定值的类型,因此无法在没有帮助的情况下按类型进行匹配。例如:
1 | package examples; |
构造函数参数类型匹配
为解决前面的问题,需要使用 type 属性显式指定构造函数参数的类型,如下:
1 | <bean id="exampleBean" class="examples.ExampleBean"> |
构造函数参数下标
可以使用 index 属性显式指定构造函数参数的下标:
1 | <bean id="exampleBean" class="examples.ExampleBean"> |
除了解决多个简单值的歧义之外,指定索引还可以解决构造函数具有相同类型的多参数的歧义。
注:下标从 0 开始。
构造函数参数名称
还可以使用构造函数参数名称进行值消歧:
1 | <bean id="exampleBean" class="examples.ExampleBean"> |
但这种方式只在 debug 模式下有效(release 模式会改变参数名),或者使用 @ConstructorProperties 注解指定参数名:
1 | package examples; |
基于 Setter 的依赖注入
基于 Setter 的依赖注入指在调用无参数构造函数或无参静态工厂方法来实例化 bean 之后,容器调用 setter 方法注入 bean。
1 | public class SimpleMovieLister { |
ApplicationContext不仅支持基于构造函数和基于 Setter 的依赖注入,甚至支持两者同时使用。如果使用了 Setter 注意添加 @Required 注解使得 bean 必须被注入。
Spring 团队通常提倡构造函数注入,因为它允许我们将应用程序组件实现为不可变对象,并确保所需的依赖项不是 null。值得一提的是,如果构造函数有太多的参数参数说明该类可能有太多的责任,最好拆分责任以更好地分离关注点。
Setter 注入应主要仅用于可在类中指定合理默认值的可选依赖项。否则,必须在代码使用依赖项的任何位置执行非空检查。setter 注入的一个好处是 setter 方法使该类的对象可以在以后重新配置或重新注入。JMX 最常用这种模式。
依赖性解决过程
容器执行 bean 依赖性解析,如下所示:
ApplicationContext创建和初始化所有 bean 的配置项元数据。配置项元数据可以由 XML,Java 代码或注解指定。- 对于每个 bean,它的依赖关系以属性,构造函数参数或静态工厂方法的参数的形式表示。当创建 bean 时,这些依赖项会被提供给 bean。
- 每个属性或构造函数参数都是要设置的值的实际定义,或者是对容器中另一个 bean 的引用。
- 作为值的每个属性或构造函数参数都从其指定的格式转换为该属性或构造函数参数的实际类型。默认情况下,Spring 能够转换成字符串格式提供给所有内置类型的值,例如 int, long,String,boolean 等。
Spring 容器在创建容器时验证每个 bean 的配置,但是直到实际创建 bean 的时候才会设置这些 bean 属性。创建时容器会创建单例作用域且需要预加载(默认)的 Bean,其他的仅在请求时才创建 bean。创建 bean 时可能会构造一张 bean 的图,因为 bean 的依赖及其依赖的依赖(等等)都需要创建和分配。这些依赖项之间的不匹配可能较晚才会被发现 —— 也就是第一次创建受影响的 bean 时。
循环依赖
使用构造函数注入时可能出现无法解析循环依赖关系的情况。
例如:类 A 通过构造函数注入类 B 的实例,而类 B 通过构造函数注入类 A 的实例。如果将 A 类和 B 类的 bean 配置为相互注入,则 Spring IoC 容器会在运行时检测到此循环引用,并抛出一个 BeanCurrentlyInCreationException。
一种可能的解决方案是改用 setter 方式注入。换句话说,尽管不推荐,但可以使用 setter 注入配置循环依赖项。
与典型情况(没有循环依赖)不同,bean A 和 bean B 之间的循环依赖强制其中一个 bean 在完全初始化之前被注入另一个 bean(类似鸡与蛋的场景)。
你通常可以相信 Spring 没有问题。容器会在加载时检测配置问题,例如对不存在的 bean 和循环依赖关系的引用。当实际创建 bean 时,Spring 会尽可能晚地设置属性并解析依赖关系。这意味着如果创建该对象或其中一个依赖项时出现问题(比如 bean 因缺失或无效属性而抛出异常)那么在请求对象时,正确加载的 Spring 容器才会抛出异常。这可能会导致无法及时暴露一些配置的问题,这就是默认情况下 ApplicationContext 需要预加载单例 bean 的原因。以一些前期时间和内存为代价,ApplicationContext 会在创建时就发现配置问题。当然我们也可以指定 bean 懒加载来代替预加载。
如果不存在循环依赖关系,当一个或多个协作 bean 被注入依赖 bean 时,每个协作 bean 在被注入依赖 bean 之前被初始化。这意味着,如果 bean A 依赖于 bean B,那么 Spring IoC 容器在调用 bean A 上的 setter 方法之前需要初始化 bean B。也就是说,bean 会被实例化(如果它不是预先实例化的单例),设置依赖项,相关的生命周期方法(如配置的 init 方法 或 InitializingBean 回调方法)也会被调用。静态工厂方法也是一样。
依赖关系和配置的详细说明
bean 属性和构造函数参数可以是其他 bean 的引用,也可以是内联定义的值,因此 Spring 的 XML 配置 <property/> 和 <constructor-arg/> 支持以下类型。
值类型
<property /> 元素的 value 属性将属性或构造函数参数指定为人类可读的字符串表示形式。 Spring 的转换服务用于将这些值从 String 转换为属性或参数的实际类型。 以下示例显示了要设置的各种值:
1 | <bean id="myDataSource" class="org.apache.commons.dbcp.BasicDataSource" destroy-method="close"> |
以下示例使用 p-namespace 进行更简洁的 XML 配置:
1 | <beans xmlns="http://www.springframework.org/schema/beans" |
也可以配置 java.util.Properties 实例,如下所示:
1 | <bean id="mappings" |
Spring 容器通过使用 JavaBeans 机制将 <value/> 元素内的文本转换为 java.util.Properties 实例 PropertyEditor。这是一个很好的快捷方式,也是 Spring 团队支持 <value/> 在 value 属性样式上使用嵌套元素的少数几个地方之一。
idref 标签
idref 标签只是一种防错方法,可以将容器中另一个 bean 的 id(字符串值 - 而不是引用)传递给 <constructor-arg/> 或 <property/> 标签。如下:
1 | <bean id="theTargetBean" class="..."/> |
前面的 bean 定义代码段与以下代码段完全等效(在运行时):
1 | <bean id="theTargetBean" class="..." /> |
第一种形式优于第二种形式,因为使用 idref 标记允许容器在部署时验证引用的命名 bean 实际存在。 第二种形式不会对传递给客户端 bean 的 targetName 属性的值执行验证,只有当客户端 bean 实际被实例化时才会发现错误(很可能是致命的错误)。 如果客户端 bean 是原型(prototype) bean,那就只能在部署容器后很长时间才能发现错误并抛出异常。
注:4.0 beans XSD 中不再支持 idref 元素的 local 属性,因为它不再提供常规 bean 引用的值。 升级到 4.0 架构时,需要将现有的 idref 本地引用更改为 idref bean。
其他 bean 的引用
bean 属性的值需要和目标 bean 的 id 或 name 相同:
1 | <ref bean="someBean"/> |
通过 parent 属性指定目标 bean 会创建对当前容器的父容器中的 bean 的引用。 parent 属性的值可以与目标 bean 的 id 属性或目标 bean 的 name 属性中的值之一相同。 目标 bean 必须位于当前 bean 的父容器中。 我们最好使用此 bean 引用方式,主要是当我们有容器层次结构并且希望将现有 bean 包装在父容器中时,该容器具有与父 bean 同名的代理。 以下显示了如何使用父属性:
1 | <!-- in the parent context --> |
1 | <!-- in the child (descendant) context --> |
注:4.0 beans XSD 不再支持 ref 元素的 local 属性,因为它不再提供常规 bean 引用的值。升级到 4.0 架构时,将现有的 ref 本地引用更改为 ref bean。
内部 bean
直接看例子:
1 | <bean id="outer" class="..."> |
集合
<list/>,<set/>,<map/>和<props/>元素分别对应 Java Collection 类型 List,Set,Map 和 Properties 的属性和参数。 如下:
1 | <bean id="moreComplexObject" class="example.ComplexObject"> |
map 的键和值、set 的值也可以是以下类型:
1 | bean | ref | idref | list | set | map | props | value | null |
合并集合
Spring 容器还支持合并集合。你可以定义父<list/>,<map/>,<set/>或<props/>元素,然后定义子<list/>,<map/>,<set/>或<props/>元素继承和覆盖父集合中的值。 也就是说,子集合的值是合并父集合和子集合的元素的结果,相同时子集合的元素覆盖父集合中指定的值。
1 | <beans> |
得到
1 | administrator=administrator@example.com |
<list/>,<map/>和<set/>集合同样会合并。 使用<list/>元素的时候,list 是有序的,且 父级的值在所有子级列表的值之前。 对于 Map,Set 和 Properties 集合类型,不存在排序。 因此,对于作为容器在内部使用的关联 Map,Set 和 Properties 实现类型的基础的集合类型,顺序是没有意义的。
合并集合的限制
我们无法合并不同的集合类型(例如 Map 和 List)。 如果不小心这么做了,则会抛出相应的异常。必须在较低的继承子定义上指定 merge 属性。 在父集合定义上指定 merge 属性是多余的,并且不会导致所需的合并。
强类型集合
通过在 Java 5 中引入泛型类型,我们可以使用强类型集合。也就是说,可以声明一种 Collection 类型,使得它只能包含(例如)String 元素。如果使用 Spring 将强类型依赖注入 Collection 到 bean 中,则可以利用 Spring 的类型转换支持,以便强类型 Collection 实例的元素在添加到之前转换为适当的 Collection 类。以下 Java 类和 bean 定义显示了如何执行此操作:
1 | public class SomeClass { |
1 | <beans> |
当为注入准备 bean 的 accounts 属性时,通过反射可获得 something 关于强类型的元素类型的泛型信息 Map<String, Float>。因此,Spring 的类型转换基础结构将各种值元素识别为类型 Float,并将字符串值(9.99, 2.75 和 3.99)转换为实际 Float 类型。
Null 和空值字符串
1 | <bean class="ExampleBean"> |
等价于
1 | exampleBean.setEmail(""); |
用 <null/> 标签标示 null:
1 | <bean class="ExampleBean"> |
等价于
1 | exampleBean.setEmail(null); |
XML 快捷方式 p-namespace
举例 1:
1 | <bean name="classic" class="com.example.ExampleBean"> |
等价于
1 | <bean name="p-namespace" class="com.example.ExampleBean" |
举例 2:
1 | <bean name="john-classic" class="com.example.Person"> |
等价于
1 | <bean name="john-modern" |
XML 快捷方式 c-namespace
Spring 3.1 中引入的 c-namespace 允许使用内联属性来配置构造函数参数,无需嵌套 constructor-arg 标签。
1 | <beans xmlns="http://www.springframework.org/schema/beans" |
对于构造函数参数名称不可用的情况(例如非 debug 模式),也可以使用参数索引,如下所示:
1 | <!-- c-namespace index declaration --> |
注:由于 XML 语法,索引表示法要求存在前导 _,因为 XML 属性名称不能以数字开头(即使某些 IDE 允许)。对于<constructor-arg>元素也可以使用相应的索引符号,但不常用,因为通常的声明顺序通常就足够了。\
复合属性名称
设置 bean 属性时,可以使用复合或嵌套属性名称,只要除最终属性名称之外的路径的所有组件都不是 null,例如:
1 | <bean id="something" class="things.ThingOne"> |
该 somethingbean 具有一个 fred 属性,该属性具有属性,该 bob 属性具有 sammy 属性,并且最终 sammy 属性的值设置为 123。在构造 bean 之后,fred 属性 something 和 bob 属性 fred 不得为 null,否则会抛出 NullPointerException。
使用 depends-on
1 | <bean id="beanOne" class="ExampleBean" depends-on="manager"/> |
那么 beanOne 会依赖 manager,只有 manager 初始化完成才会构建 beanOne
懒加载
1 | <bean id="lazy" class="com.something.ExpensiveToCreateBean" lazy-init="true"/> |
ApplicationContext 启动时不会初始化 lazy 的 bean。
但是,当延迟初始化的 bean 是未进行延迟初始化的单例 bean 的依赖项时,ApplicationContext 会在启动时创建延迟初始化的 bean,因为它必须满足单例的依赖关系。
自动注入合作 bean
Spring 容器可以自动连接协作 bean 之间的关系。 我们可以通过检查 ApplicationContext 的内容让 Spring 自动为 bean 解析协作者(其他 bean)。 自动装配具有以下优点:
自动装配可以显着减少指定属性或构造函数参数的需要。
自动装配可以随着对象的发展更新配置。例如,如果需要向类添加依赖项,则可以自动满足该依赖项,而无需修改配置。因此,自动装配在开发期间尤其有用,而不会在代码库变得更稳定时否定切换到显式布线的选项。
使用基于 XML 的配置元数据(请参阅依赖注入)时,可以使用<bean/>元素的 autowire 属性为 bean 定义指定 autowire 模式。自动装配功能有四种模式。 下表描述了四种自动装配模式:
| 模式 | 解释 |
|---|---|
| no | (默认)无自动装配。Bean 引用必须由 ref 元素定义。不建议对较大的部署更改默认设置,因为明确指定协作者可以提供更好的控制和清晰度。在某种程度上,它记录了系统的结构。 |
| byName | 按属性名称自动装配。Spring 查找与需要自动装配的属性同名的 bean。例如,如果 bean 定义按名称设置为 autowire 并且它包含一个 master 属性(即,它有一个 setMaster(..)方法),则 Spring 会查找名为 bean 的定义 master 并使用它来设置属性。 |
| byType | 如果容器中只存在一个属性类型的 bean,则允许属性自动装配。如果存在多个,则抛出致命异常,且可能不会根据类型对该 bean 使用自动装配。如果没有匹配的 bean,则不会发生任何事情(该属性未设置)。 |
| constructor | 类似 byType 但适用于构造函数参数。如果容器中没有构造函数参数类型的一个 bean,则会引发致命错误。 |
自动装配的局限和缺点
显式依赖项 property 和 constructor-arg 设置始终覆盖自动装配,且不能自动装配简单属性,例如基元 Strings 和 Classes(以及此类简单属性的数组)。这种限制是设计决定的。
自动装配不如显式布线精确。虽然如前面的表中所述,但 Spring 会谨慎地避免在可能产生意外结果的模糊性的情况下进行猜测。我们不再明确清楚 Spring 管理对象之间的关系。
可能无法为可能从 Spring 容器生成文档的工具提供装配信息。
容器中的多个 bean 定义可以匹配 setter 方法或构造函数参数指定的类型以进行自动装配。对于数组,集合或 Map 实例,这不一定是个问题。但是,对于期望单个值的依赖关系,这种模糊性不是任意解决的。如果没有可用的唯一 bean 定义,则抛出异常。
在这种情况下,你有一些选择:
放弃自动装配,支持显式装载。
通过将其 autowire-candidate 属性设置为 bean,可以避免对 bean 定义进行自动装配 false,如下一节所述。
通过将其
<bean/>元素的 primary 属性设置为 true,将单个 bean 定义指定为主要候选者。实现基于注释的配置可用的更细粒度的控件,如基于注释的容器配置。
从自动装配中排除 Bean
在每个 bean 的基础上,我们可以从自动装配中排除 bean。在 Spring 的 XML 格式中,将元素的 autowire-candidate 属性设置<bean/>为 false。容器使特定的 bean 定义对自动装配基础结构不可用(包括@Autowired 等注解配置)。
我们还可以根据与 bean 名称的模式匹配来限制 autowire 候选者。 <beans/>元素在其 default-autowire-candidates 属性中接受一个或多个模式。 例如,要将 autowire 候选状态限制为名称以 Repository 结尾的任何 bean,请提供值* Repository。 要提供多个模式,请在逗号分隔的列表中定义它们。 bean 定义的 autowire-candidate 属性的显式值 true 或 false 始终优先。 对于此类 bean,模式匹配规则不适用。
这些技术对于永远不希望通过自动装配注入其他 bean 的 bean 非常有用。这并不意味着排除的 bean 本身不能使用自动装配进行配置。相反,bean 本身不是自动装配其他 bean 的候选者。
方法注入
在大多数应用程序场景中,容器中的大多数 bean 都是单例。当单例 bean 需要与另一个单例 bean 协作或非单例 bean 需要与另一个非单例 bean 协作时,通常通过将一个 bean 定义为另一个 bean 的属性来处理依赖关系。但是当 bean 生命周期不同时会出现问题。假设单例 bean A 需要使用非单例(原型)bean B,可能是在 A 上的每个方法都调用。但是容器只创建一次单例 bean A,因此只有一次机会来设置属性。每次需要时,容器都不能为 bean A 提供 bean B 的新实例。
有一种不太好解决方案是放弃一些 IoC,你可以通过实现 ApplicationContextAware 接口使 bean A 意识到容器,每次通过一个 getBean("B") 调用来请求一个新的 bean B 实例,就像下面这样:
1 | // a class that uses a stateful Command-style class to perform some processing |
但是这么做会使得业务代码知道并耦合到 Spring Framework,正确的做法应当是使用方法注入。方法注入是 Spring IoC 容器的一个高级功能,可以让开发者干净地处理这个用例。
查找方法注入
查找方法注入是指容器可以重写容器管理的 bean 上的方法并返回查找结果给容器中另一个命名 bean。查找通常涉及原型 bean,如上一节中描述的场景。Spring Framework 通过使用 CGLIB 库中的字节码生成来动态生成重写该方法的子类来实现此方法注入。
- 为了使这个动态子类生效,Spring bean 容器子类不能是
final的类,要覆盖的方法也不能是final。- 对具有抽象方法的类进行单元测试需要自己对类进行子类化,并提供抽象方法的桩实现。
- 组件扫描也需要具体的方法,这需要具体的类来获取。
- 另一个关键限制是查找方法不适用于工厂方法,特别是配置类中的
@Bean方法,因为在这种情况下,容器不负责创建实例,因此无法在运行时生成子类。
对于之前的 CommandManager,Spring 容器需要动态地覆盖 createCommand() 方法的实现:
1 | package fiona.apple; |
在这个例子中,要注入的方法需要以下形式的签名:
1 | <public|protected> [abstract] <return-type> theMethodName(no-arguments); |
我们进行如下的配置:
1 | <!-- a stateful bean deployed as a prototype (non-singleton) --> |
这样,myCommand 会被动态注入。也可以使用 @Lookup 注解:
1 | public abstract class CommandManager { |
或者直接根据返回值推断:
1 | public abstract class CommandManager { |
请注意,我们通常应该使用具体的桩实现来声明这种带注释的查找方法,以使它们与 Spring 的组件扫描规则兼容,默认情况下抽象类被忽略。此限制不适用于显式注册或显式导入的 bean 类。(这段话我没看懂)
另一种解决方案是使用 ObjectFactory / Provider 注入点,详见下文。
任意方法替换
与查找方法注入相比,一种不太有用的方法注入形式是能够使用另一个方法实现替换托管 bean 中的任意方法。这部分不重要,跳过也没关系。
使用基于 XML 的配置元数据,我们可以使用 replaced-method 元素将已存在的方法实现替换为已部署的 bean。比如下面的例子,我们想覆盖它的 computeValue 方法:
1 | public class MyValueCalculator { |
实现 org.springframework.beans.factory.support.MethodReplacer 接口的类提供了新的方法定义:
1 | /** |
部署原始类并指定方法覆盖的 bean 定义类:
1 | <bean id="myValueCalculator" class="x.y.z.MyValueCalculator"> |
可以使用 <arg-type/> 元素中的一个或多个元素 <replaced-method/> 来指示被覆盖的方法的方法签名。仅当方法重载且类中存在多个变体时,才需要参数的签名。为方便起见,参数的类型字符串可以是完全限定类型名称的子字符串。
比如java.lang.String、String、Str都可以匹配java.lang.String。
Bean 的作用域
Spring Framework 支持六种作用域,其中后四种作用域仅在使用 Web 感知的 ApplicationContext 才可用。
| 作用域 | 描述 |
|---|---|
| 单例 | (默认)将单个 bean 定义范围限定为每个 Spring IoC 容器的单个对象实例 |
| 原型(prototype) | 每次都创建新的对象 |
| 请求(request) | 作用域为单个 HTTP 请求,也就是说,每个 HTTP 请求都有自己的 bean 实例 |
| 会话(session) | 作用域为单个 HTTP Session |
| 应用(application) | 作用域为整个 ServletContext |
| websocket | 作用域为单个 WebSocket 期间 |
前两个比较简单,不再详细解释。
值得一提的是,使用具有依赖于原型 bean 的单例作用域 bean 时,依赖项会在单例 bean 初始化的时候被注入,此后拿到的永远是同一个原型 bean 而并未创建新的。如果需要每次都能在运行时注入新的原型 bean,参见上文方法注入。
Request, Session, Application 和 WebSocket 作用域
仅当使用 Web 感知的 Spring ApplicationContext 实现(例如 XmlWebApplicationContext)时,Request、Session、Application 和 websocket 作用域才可用。如果将这些作用域与常规的 Spring IoC 容器(例如 ClassPathXmlApplicationContext)一起使用,则会引发由于未知 bean 作用域的 IllegalStateException。
初始 Web 配置
要在请求,会话,应用程序和 websocket 级别(统称 Web 作用域)支持 bean 的作用域,在定义 bean 之前需要做一些初始配置。(单例和原型这两种标准范围不需要此初始设置)
如何初始设置取决于具体的 Servlet 环境。
如果在 Spring Web MVC 中访问 scoped bean,实际上是在 Spring DispatcherServlet 处理的请求中,则无需进行特殊设置。 DispatcherServlet 已经公开了所有相关状态。
如果使用 Servlet 2.5 的 Web 容器,并且在 Spring 的 DispatcherServlet 之外处理请求(例如,使用 JSF 或 Struts 时),则需要注册 org.springframework.web.context.request.RequestContextListener 的 ServletRequestListener。对于 Servlet 3.0+,可以使用该 WebApplicationInitializer 接口以编程方式完成。或者对于旧容器可以添加以下声明到 web.xml:
1 | <web-app> |
如果不方便设置 Listener,也可以使用 RequestContextFilter:
1 | <web-app> |
DispatcherServlet,RequestContextListener 和 RequestContextFilter 都可以做同样的事情,也就是将 HTTP 请求对象绑定到为该请求提供服务的 Thread。这使得请求和会话范围的 bean 可以在调用链的下游进一步使用。
Request 作用域
1 | <bean id="loginAction" class="com.something.LoginAction" scope="request"/> |
也可以使用 @RequestScope 注解。
作为依赖项的 Scoped Bean
Spring IoC 容器不仅管理对象(bean)的实例化,还管理协作者(或依赖关系)的连接。如果要将(例如)HTTP 请求范围的 bean 注入到寿命较长范围的另一个 bean 中,我们可以选择注入 AOP 代理来代替范围内的 bean。也就是说,需要注入一个代理对象,该对象公开与范围对象相同的公共接口,但也可以从相关范围(例如 HTTP 请求)中检索真实目标对象,并将方法调用委托给真实对象。
具体的操作涉及到 AOP,之后详细解释。
注:CGLIB 只拦截公共方法的调用。
自定义作用域
bean 的作用域机制是可扩展的。我们可以定义自己的范围,甚至可以重新定义现有的作用域,尽管后者被认为是不好的做法且我们也无法重写内置的 singleton 和 prototype 范围。
创建自定义作用域
要将自定义作用域集成到 Spring 容器中,需要实现 org.springframework.beans.factory.config.Scope 接口,本节将对此进行介绍。 有关如何实现自己的作用域的想法,可以参阅 Spring Framework 和 Scope javadoc 提供的 Scope 实现,它解释了需要更详细地实现的方法。
Scope 接口有四个方法可以从作用域获取、删除对象,以及销毁对象。
1 | Object get(String name, ObjectFactory objectFactory); |
最后一个方法可以获取作用域下的对话(conversation) ID。
不同的作用域下的 id 互不相同,同一个作用域下使用同一个 ID。
使用自定义作用域
在写好一个或多个自定义 Scope 实现之后,我们需要让 Spring 容器知道这个新的作用域。这个方法是使用 Spring 容器注册新 Scope 的核心方法:
1 | void registerScope(String scopeName, Scope scope); |
此方法在 ConfigurableBeanFactory 接口上声明,该接口可通过 Spring 随附的大多数具体 ApplicationContext 实现上的 BeanFactory 属性获得。
例如:
1 | Scope threadScope = new SimpleThreadScope(); |
接下来就可以使用
1 | <bean id="..." class="..." scope="thread"> |
此外也可以使用 CustomScopeConfigurer 来注册一个 Scope:
1 |
|
注:在 FactoryBean 实现中放置 <aop:scoped-proxy/> 时,被限制作用域的工厂 bean 本身,而不是从 getObject() 返回的对象。